A girl and her love of nail polish

Posts tagged ‘Zoya’

Zoya Sweet With Easter Hello Kitty Water Decals

A day late with this but I still wanted to post it since I took and edited the photos already. This was a quick and dirty manicure I wore for Easter, though I can’t say it was one of my best.

Zoya Sweet with Hello Kitty Easter Water Decals

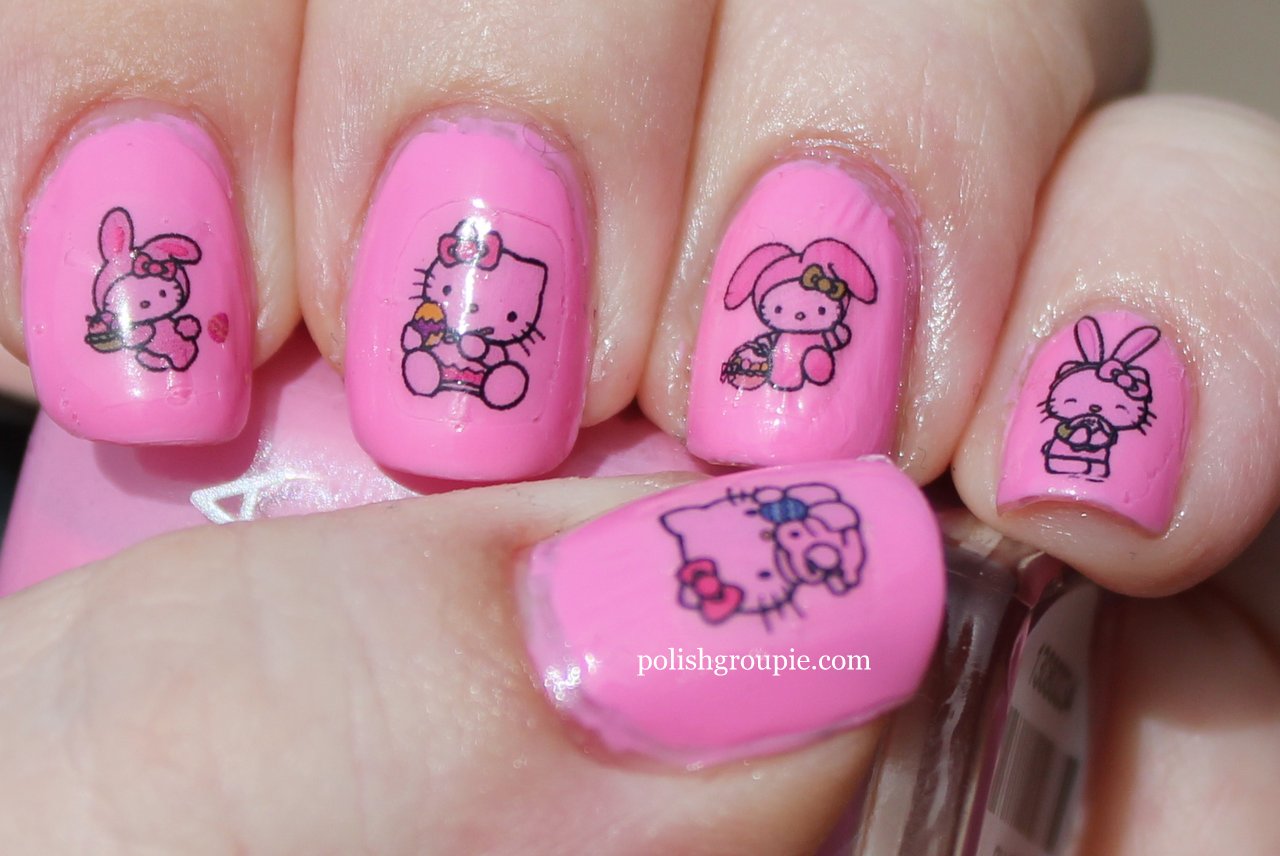
I started with Zoya Sweet, a bubblegum pink creme. I was not very happy with the application. It went on pretty patchy with a fair amount of balding. It looked okay with two coats on my right hand but for some reason I needed three on my left to get adequate coverage, and then an additional coat on my ring finger because I accidentally dinged it before it was dry.

Zoya Sweet with Hello Kitty Easter Water Decals

I added one coat of Poshe fast-dry top coat and then I added Hello Kitty Easter water slide decals from RLR Creations.

Zoya Sweet with Hello Kitty Easter Water Decals

They would have looked better over white polish but I had already done that for my Halloween Hello Kitty manicure, so I was curious to see how they looked over a color. Meh, not a fan.

Zoya Sweet with Hello Kitty Easter Water Decals

I finished it off with a coat of Poshe. I did the manicure Saturday night and took the photos on Sunday morning. Within that time, as you can see, there was significant shrinkage around the cuticle line. I find that Poshe has trouble with shrinkage on thick polish so I think the build-up of layers worked against me here.

Zoya Sweet with Hello Kitty Easter Water Decals

I also dinged up the ring finger when applying the decal. Ugh.

Better luck next year.

Zoya Ornate: Aurora

Hope everyone had a good holiday and picked up a lot of good deals over Black Friday weekend. I’ve got a lot of new indie polishes coming my way, so can’t wait to show them to you when they arrive.

I’ve been procrastinating on putting up any polish posts over the past week or so because one of the nails on my swatching hand broke clean off and I wasn’t ready to face the fact that I’d need to even everything out. 😦

Zoya Aurora: Ornate Collection

But here I am with my new short nails to show off Aurora from the Zoya Ornate holiday collection. I would describe this as a purple berry shade, and then off course its got a lot of holographic glitter in it. I really love the formula on this. If you took a heavy holo polish and diluted it a bit with a jelly polish, you would end up with Aurora.

This is three coats with one coat of Poshe fast-dry top coat.

Zoya Aurora: Ornate Collection

The accent nail is one coat of A Piece of Love from Essence’s Breaking Dawn Part 2 collection. Originally I didn’t buy this one but I picked it up after reading on a few other blogs that it’s great for stamping. FYI, the formula on A Piece of Love is about a hundred times better than the others in the collection.

Zoya Aurora: Ornate Collection

I added one coat of Poshe and then taped off half the nail and added two coats of Aurora to the other half of the nail. I finished it off with another coat of Poshe.

Zoya Aurora: Ornate Collection

Pretty & Polished Island of Misfit Toys; Love Always, Candy Cain; and Pretty As A Peacock

This morning I’ve got three new shades from indie nail polish maker Pretty & Polished. All of these go on sale today, so feast your eyes and then high-tail it over to Chelsea’s Etsy shop (the restock is scheduled for 10amET today). I’m showing two holiday shades: Island of Misfit Toys and Love Always, Candy Cain, plus another new one called Pretty As A Peacock. Even though some of these are officially “holiday” colors, there’s nothing about them that would keep you from wearing them any time you want.

First up is Island of Misfit Toys, a fantastic multi-color glitter topper in a clear base.There’s too much stuff in here to really describe it all. Hexes, squares, bars … red, green, blue, purple, pink, silver, gold. Pretty! This one is my favorite of the three, and I think it’s easy to see why.

This is two coats of Island of Misfit Toys over three coats of Zoya Jolene, no top coat.

Pretty & Polished Island Of Misfit ToysPretty & Polished Island Of Misfit Toys

Pretty & Polished Island Of Misfit Toys

Pretty & Polished Island Of Misfit Toys

Next is Love Always, Candy Cain, another glitter topper in a clear base. This one has primarily red and white glitter in it, including large white and red hearts, as well as large white hex glitter. I did have a little trouble fishing out the larger pieces, especially the white hearts. There are a ton of them in there, I just couldn’t catch one!

This is two coats of Love Always, Candy Cain over two coats of Sinful Colors Exotic Green, for a classic Christmas look. It’s topped off with one coat of Poshe fast-dry top coat.

Pretty & Polished Love Always, Candy CainPretty & Polished Love Always, Candy CainPretty & Polished Love Always, Candy Cain

Pretty & Polished Love Always, Candy Cain

Finally I’ve got Pretty As A Peacock, which is kind of hard to describe. It’s got a gray-green shimmer base with purple, green and teal glitter. It’s not really glossy, more of a satin finish. Really lovely.

This is two coats of Pretty As A Peacock plus one coat of Poshe.

Pretty & Polished Pretty As A Peacock

Pretty & Polished Pretty As A Peacock

Pretty & Polished Pretty As A Peacock

Pretty & Polished Pretty As A Peacock

Hope you enjoyed these, they’re all really fun. Happy hunting!

Nail-aween Nail Art Challenge: Pumpkin Nail Art

Happy Halloween!,Here I am with my Day 9 post for the Nail-aween Nail Art Challenge from datyorkLOVES/SassyNails. (I’ll have the last post of the challenge up later today). The theme for Day 9 is pumpkins, and I just went with a cute, simple design.

Pumpkin Halloween Fall Nail Art

I started with four coats of Megan Miller Lemon Ice, a very pale yellow creme, followed by one coat of Poshe fast-dry top coat.

Pumpkin Halloween Fall Nail Art

For the pumpkins, I used Zoya Jancyn, a bright orange creme. To make the pumpkins, I used the round end of a wooden skewer because I didn’t have a large enough dotting tool. I placed two dots so that they slightly overlapped.

Pumpkin Halloween Fall Nail Art

For the stem and vines, I used green It’s So Easy Stripe Rite striper polish. I used a small dotting tool to add a little bit of black (Orly Liquid Vinyl) to the vines to give a little shading.

Pumpkin Halloween Fall Nail Art

Then I added some shading to the pumpkin using a small dotting tool. I mixed a bit of Zoya Jancyn with NYC French White Tip (a white creme) to create a lighter orange. I finished it off with a coat of Poshe.

Nail-aween Halloween Nail Art Challenge


Check out all of the NailAween Nail Art Artists!

Nail-aween Nail Art Challenge: Water Marble

So this is my Day 1 post for the Nail-aween Nail Art Challenge from datyorkLOVES/SassyNails. There are 10 themes and I have to complete all of them by the end of October, but other than that, it’s self-paced.

So today’s theme is water marble. I’m not that happy with the way it came out. I tried to fix it, and I think that made it worse. Alas.

Halloween Water Marble Nail Art

I started with two coats of Ulta Snow White and then moved on to the water marble. I went with Halloween colors: black – Orly Liquid Vinyl; orange – Zoya Jancyn; purple – Sally Hansen Rock Hard; and white – Ulta Snow White.

Halloween Water Marble Nail Art

When I was done, I thought some of them looked a little messy so I tried to camouflage with some dots, using Sally Hansen Rock Hard. The polish was a bit on the sheer side, so then I started with a dot of Ulta Snow White and laid a dot of Rock Hard on top of it. Mistake. They didn’t look that great, and the smeared a bit on my index finger when I added a coat of Poshe fast dry top coat, making it look messier than it really was. I should have just left well enough alone and not tried to add the dots.

Halloween Water Marble Nail Art

Cleanup was a little tough with this; I suppose that’s par for the course.

Halloween Water Marble Nail Art

I did like the way the middle finger came out,and the ring finger almost looked like a spider web.

Nail-aween Halloween Nail Art Challenge

Check out all of the NailAween Nail Art Artists!

30 Day Challenge Day 23 – Movie: Wizard Of Oz

I had the idea for this manicure pretty early on but it took me a little while to figure out exactly how to portray it. Day 23’s manicure theme is inspired by a movie, and the movie I chose is The Wizard Of Oz.

Wizard Of Oz Nail Art

Wizard Of Oz Nail Art

My thumb is for Dorothy, a blue and white gingham pattern like her dress. I used Ulta Snow White as the base, my untried for the 30 Days of Untrieds challenge I’m doing simultaneously. For the stripes, I used Nails Inc. Baker Street. I mixed it with white for the lighter shade of blue.

Dorothy Gingham Wizard Of Oz Nail Art

My index finger is for the Cowardly Lion. The base is Sinful Colors Let’s Meet. The middle finger is patches for the Scarecrow, on a base of Essie Mocacino.

Cowardly Lion, Scarecrow Wizard Of Oz Nail Art The ring finger is for the Tin Man getting his heart, on a base of Sonia Kashuk Smoke And Mirrors, and the pinkie is Glenda the Good Witch’s wand, on a base of Sinful Colors Social Ladder.

Tin Man, Good Witch Wizard Of Oz Nail Art

I used a bunch of other colors and lost track a little bit. I know there’s some Zoya Codie in the lion’s mane and the face, the patches are Nails Inc. Baker Street and Essie Very Cranberry, which I also used as the heart. The wand is silver and black striper polish from Kiss.

Wizard Of Oz Nail Art

I topped it off with Poshe fast-dry top coat.

30-Day Challenge, 30 Days of Untrieds

Please visit some of the other bloggers that are participating in the 30 Day Challenge this month.
I know we will need a lot of encouragement to get through! Click here to see them:


30 Day Challenge Day 19: Galaxy Nails

30 Day Challenge Day 19: Galaxy Nails

I’ve been looking forward to Day 19 of the 30 Day Challenge because I’ve been wanting to try galaxy nails and needed the kick in the pants to do it.

Galaxy Nails nail art manicure

By most accounts, creating galaxy nails is a simple nail art project. Well, it is and it isn’t. The technique is simple: dab and dot. Ok, got it. The challenge comes in that it requires a fair amount of restraint. Less is definitely more when it comes to galaxy nails. I read several blog posts and watched many video tutorials, all of which said basically the same thing: be sparse, don’t overdo it with the sponging, leave some space.

Galaxy Nails nail art manicure

But even fully armed with that knowledge, I found it difficult to know when to stop. I think a few of these came out rather nicely; a few are kind of meh. Overall, it was fun and I will definitely do it again.

Galaxy Nails nail art manicure

I used a lot of different colors here, but not all of them were used on every nail. I started with two coats of Orly Liquid Leather, a high-gloss black creme, for the base, followed by one coat of Poshe fast-dry top coat. When it was dry, I sponged on various combinations of these with the corner of a makeup sponge:

  • OPI DS Mystery (untried):  purple-black jelly with gold shimmer
  • Orly Meet Me Under The Mistletoe (Untried): green/gold duochrome
  • Orly Stone Cold (Untried): bright medium blue shimmer
  • Zoya Wednesday: dusty turquoise creme
  • Cult Nails Enigmatic (Untried): eggplant with strong shimmer
  • A-England Morgan Le Fay: sheer white iridescent shimmer
  • Sally Hansen Complete Salon Manicure Wine Not (Untried): berry red with shimmer
  • Kiko 359 (Untried): peach creme

I finished each nail with one coat of Jordana Lilac Hearts. It’s a glitter polish with large purple hearts, but I just left those at the bottom of the bottle and only used the glittery base to get the effect of lots of small stars. Then I put on on a few (too many in some cases) dots with NYC French White Tip using a small dotting tool.

Galaxy Nails nail art manicure

Finished up with one coat of Poshe and called it a night.

30-Day Challenge, 30 Days of Untrieds

Please visit some of the other bloggers that are participating in the 30 Day Challenge this month.
I know we will need a lot of encouragement to get through! Click here to see them:


Tag Cloud