A girl and her love of nail polish

Posts tagged ‘Ulta’

12 Days Of Christmas Challenge: Candy Cane French Tips

Day 3 of the 12 Days Of Christmas Nail Art Challenge sponsored by Pink & Polished Nails and Over Polished brings us to candy canes.

Candy Cane French Tips

For mine I did candy cane french tips. I started with one coat of clear base coat and then one coat of China Glaze Fairy Dust to the whole nail.

Candy Cane French Tips

Then I taped off my tips and applied two coats of OPI My Boyfriend Scales Walls, followed by one coat of Poshe fast-dry top coat. When that was dry, I re-taped my tips and added stripes. I applied the red, Ulta Steppin Out, with a small nail art brush. The green is an It’s So Easy Stripe Rite striper polish.

Candy Cane French TipsCandy Cane French Tips

I finished with one coat of Poshe.

12 Days Of Christmas Nail Art Challenge

Please visit some of the other bloggers participating in the 12 Days Of Christmas Nail Art Challenge:


12 Days Of Christmas Challenge: Christmas Trees

Today is the first day of the 12 Days Of Christmas Nail Art Challenge sponsored by Pink & Polished Nails and Over Polished. The theme for today is Christmas Trees.

\Christmas Nail Art: Christmas Trees

I started with three coats of OPI My Boyfriend Scales Walls, a grayish white creme. I then used tape to create a triangle on my ring finger and then filled it in with dots in various sizes. The red is Ulta Steppin Out, the green is Sinful Colors Exotic Green and the gold is Essence  A Piece Of Forever from the Twilight Breaking Dawn Part 2 collection. I used a silver Kiss Nail Art striper to add some tinsel. I outlined the sides of the tree with a green It’s So Easy Stripe Right striper and added a star-shaped rhinestone at the top. Everything is topped off with Poshe fast-try top coat.

Christmas Nail Art: Christmas Trees

The dots on the other nails are Ulta Steppin Out and Sinful Colors Exotic Green.

Christmas Nail Art: Christmas Trees

12 Days Of Christmas Nail Art Challenge

Please visit some of the other bloggers participating in the 12 Days Of Christmas Nail Art Challenge:


Ulta Hide And Go Sequins

I’ve got a short and sweet one for you this morning. I recently picked up the Ulta Glitterati Minis collection on sale for $4. If there’s an Ulta near you, I recommend running out to see if they have any left because it’s a great little set.

Ulta Glitterati Mini: Hide And Go Sequins

Ulta Glitterati Mini: Hide And Go Sequins

This is Hide And Go Sequins, a lovely blue jelly with tons of blue and green glitter packed in. It’s basically a jelly sandwich in a bottle. Some bloggers have said this is a dupe of Deborah Lippmann Across The Universe but I don’t have it to compare. It does look close based on swatches I’ve seen. At this price, who cares whether it’s exact or not; it’s close enough! Now I wish it was a full-size bottle.

Ulta Glitterati Mini: Hide And Go Sequins

I’m showing three coats here with no top coat. Awesome color! The other three colors in the set are all similarly glitter-ific.

Ulta Glitterati Mini: Hide And Go Sequins

Ulta Glitterati Mini: Hide And Go Sequins

Patriotic Election Day Caviar Nails

Happy Election Day to all of my readers in the U.S.! I hope that you will all be able to get out and vote.

In honor of today’s festivities, I’ve got some patriotic red, white and blue nails to show you. They are blinged up a little bit with some microbeads, also known as caviar nails.

Patriotic Election Day Caviar Nails

Here are the base colors: blue – Nails Inc Baker Street; red – Sinful Colors Ruby Ruby; white – Ulta Snow White and A England Morgan Le Fay.

The microbeads are Recollections brand, which I bought as part of two different sets at Michaels. The red beads are called Cherry; the white are actually Clear. [UPDATE: I did this manicure late last night, and when I woke up this morning, most of the red microbeads looked like they had changed color to a metallic bronze-silver shade. Not sure if it was rubbed off, washed off or what.]

Patriotic Election Day Caviar Nails

I started with one coat of polish on each nail. For the white thumb, I used Ulta Snow White for the first coat. Then I added a second coat to the blue nails and sealed them with one coat of Poshe fast-dry top coat.

Patriotic Election Day Caviar Nails

Then onto the beads. With a paper plate underneath to catch the stray beads, I painted one nail with a second coat of polish and then poured the beads over the wet nail. I gently tamped them down with my finger to make sure they were all settled into one layer and sunk into the wet polish a bit. I then sealed off just the tip edge of the nail with a regular clear top coat. Rinse and repeat.

I poured the extra beads from the plate back into the bottle. Make sure the plate is clean before you switch colors or you’ll end up mixing your beads.
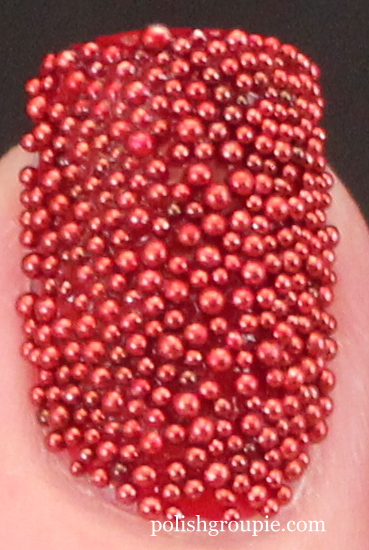
Patriotic Election Day Caviar Nails

One word of caution: be careful when you open these bottles. When I opened the first one, the beads kind of shot out and got all over the place. Not the easiest little suckers to clean up!

Patriotic Election Day Caviar Nails

Nail-aween Nail Art Challenge: Ghosts and Goblins

It’s Day 5 of the Nail-aween Nail Art Challenge from datyorkLOVES/SassyNails. for me, and the theme is ghosts and goblins. There are 10 themes, and I have to complete all of them by the end of October, but other than that, it’s self-paced.Ghosts Goblin Jack-o-lantern pumpkin Halloween nail art

As far as Halloween nail art goes, this one is pretty basic, really just a few doodles with some nail art pens.

For my ghost, I used two coats of Ulta Snow White. The green goblin starts off with two coats of Sinful Colors Exotic Green, while the two jack-o’-lantern pumpkin nails are two coats of a no-name orange creme from a polish line called Paris. The black “Boo” nail is based on two coats of Orly Liquid Vinyl.

Ghosts Goblin Jack-o-lantern pumpkin Halloween nail art

All of the black and white details were done with Nail Artist pens from Kiss, which came together as a pair. I bought them at Target. These types of pens are great, really no different than using a regular pen. The black was perfect for what I needed here; the white didn’t cover quite as well as I had hoped.

Ghosts Goblin Jack-o-lantern pumpkin Halloween nail art

If you do something like this, definitely do a practice run where you’re drawing upside down before you start drawing on your nail. There really wasn’t a good way to hold my hand where I could hold it with the tips pointed toward me and still draw on them.

Nail-aween Halloween Nail Art Challenge

Check out all of the NailAween Nail Art Artists!

Nail-aween Nail Art Challenge: Mummy Water Marble

I couldn’t come up with anything unique for Day 4 of the Nail-aween Nail Art Challenge from datyorkLOVES/Sassy Nails, so I modeled my mummy nails after my favorite version, from Colette at My Simple Little Pleasures, who is the queen of water marble nail art.

Obviously mine do not compare to hers, but I did give it the old college try. I tried to model my color choices on the ones she features in the video tutorial, but I realized after the fact that mine actually had too much white in it. Having more of the ivory and brown shades is what makes hers look more like mummy wrapping.

Mummy water marble Halloween nail art

For mine I started with two coats of Ulta Snow White as the base. I also used it for the water marble, along with Megan Miller Lemon Ice (which I mistakenly thought would come across a ivory) and Essie Mink Muffs, which is one of my favorite brown shades. I added one coat of Poshe quick-dry top coat at this point.Mummy water marble Halloween nail art

For the eyes, I applied Orly Liquid Vinyl, a black creme, using a small nail art brush. For the eyeballs, I used the head of a pin for the larger dots and a small dotting tool for the smaller dots, Ulta Snow White and Ulta Steppin Out. I finished it with one coat of a regular top coat.

Mummy water marble Halloween nail art

As far as the water marble goes, I think I actually had sections that looked better than what I was able to get onto the nails, but that’s just one of the many challenging aspects of water marbling that I have yet to conquer. I dipped multiple nails at one time on this one, so not sure if that helped because it was quicker or hurt because I might have gotten better design placement if I had been doing one at a time.

Mummy water marble Halloween nail art

When you do water marbling, do you usually do multiple nails at once? If so, any tips?

Nail-aween Halloween Nail Art Challenge

Check out all of the NailAween Nail Art Artists!

Nail-aween Nail Art Challenge: Bloody Nails

Here’s my Day 3 entry for the Nail-aween Nail Art Challenge from datyorkLOVES/SassyNails. There are 10 themes, and I have to complete all of them by the end of October, but other than that, it’s self-paced.

Halloween Nail Art: Blood Smears

Today’s theme is bloody nails. I tried to do something a little different here since there are so many creepy examples out there of Halloween manicures or vampire-themed nail art featuring drippy and splattered blood. I went for smears instead, as if someone had smeared blood on a wall.

Halloween Nail Art: Blood Smears

I started with two coats of OPI Berlin There Done That, a nice neutral taupe that I thought could very easily stand in for a wall color.

Then I used Ulta Steppin Out for the blood smears. I think both the color and the thicker consistency of this polish mimic real blood.

Halloween Nail Art: Blood Smears

My technique on this was to drop some of the red polish onto a piece of wax paper. I then used the straight edge of a piece of paper and dragged it through the polish, then dragged it across the nail. In some cased I dragged left to right, other times dragged downward.

Nail-aween Halloween Nail Art Challenge

Check out all of the NailAween Nail Art Artists!

Tag Cloud