A girl and her love of nail polish

Posts tagged ‘Water Marble’

Nail-aween Nail Art Challenge: Witch Magic Water Marble

I took a few liberties with Day 8 of the Nail-aween Nail Art Challenge from datyorkLOVES/SassyNails. The theme is witches, but instead of doing a green face or a pointed hat (many have already done those way better than I could), I wanted to try to portray a different aspect of witches: magic.

My thinking was something swirly and purple with some stars, so here’s what I came up with: water marble with fimo stars.

Halloween Water Marble Magic Witch Nail Art

I started with three coats of A-England Morgan Le Fay as the base, which is a super shimmery white. I was planning to use it in the water marble, but as soon as I started I remembered that this polish is no good for water marbles. It just doesn’t spread out over the water well. Oh well.

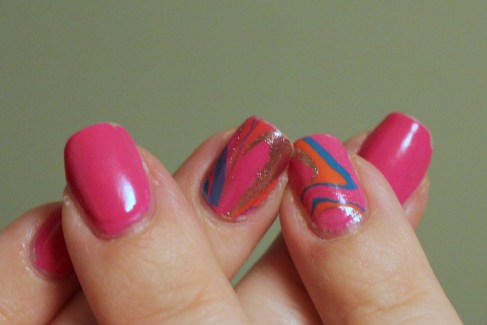
For the water marble, I used three polishes: Essie Sexy Divide (deep shimmery purple), Orly Rage (rose gold metallic) and OPI Lincoln Park After Dark (vampy near-black burgundy creme).

Halloween Water Marble Magic Witch Nail Art

I found this video tutorial on how to do a swirl water marble. As usual with water marbling, it always turns out to be much harder than it looks. I couldn’t quite get the swirl effect I was going for, but I still like the way it came out.

Halloween Water Marble Magic Witch Nail Art

The fimo stars are from a recent EBay spree. I used regular top coat to glue them on and seal them, and then a coat of Poshe fast-dry top coat over the whole nail.

This nail is the one that came the closest to what I wanted in terms of the swirl effect.

Halloween Water Marble Magic Witch Nail Art

Nail-aween Halloween Nail Art Challenge

Check out all of the NailAween Nail Art Artists!

Nail-aween Nail Art Challenge: Water Marble

So this is my Day 1 post for the Nail-aween Nail Art Challenge from datyorkLOVES/SassyNails. There are 10 themes and I have to complete all of them by the end of October, but other than that, it’s self-paced.

So today’s theme is water marble. I’m not that happy with the way it came out. I tried to fix it, and I think that made it worse. Alas.

Halloween Water Marble Nail Art

I started with two coats of Ulta Snow White and then moved on to the water marble. I went with Halloween colors: black – Orly Liquid Vinyl; orange – Zoya Jancyn; purple – Sally Hansen Rock Hard; and white – Ulta Snow White.

Halloween Water Marble Nail Art

When I was done, I thought some of them looked a little messy so I tried to camouflage with some dots, using Sally Hansen Rock Hard. The polish was a bit on the sheer side, so then I started with a dot of Ulta Snow White and laid a dot of Rock Hard on top of it. Mistake. They didn’t look that great, and the smeared a bit on my index finger when I added a coat of Poshe fast dry top coat, making it look messier than it really was. I should have just left well enough alone and not tried to add the dots.

Halloween Water Marble Nail Art

Cleanup was a little tough with this; I suppose that’s par for the course.

Halloween Water Marble Nail Art

I did like the way the middle finger came out,and the ring finger almost looked like a spider web.

Nail-aween Halloween Nail Art Challenge

Check out all of the NailAween Nail Art Artists!

30 Day Challenge Day 20: Water Marble

I’ve made it to Day 20, two-thirds of the way through the 30 Day Challenge. Hooray! The challenge themes are real-deal from here on out, starting with today’s water marble.

water marble: cult nails manipulative and revlon fashionista

Water marbles are tough for me. I’ve played around with them a few times, including this earlier attempt where I definitely learned a few good lessons. I think that the success or failure of a water marble is largely dependent on the polish choice. If the polishes don’t look good or behave well, you’re sunk (pun intended)!

It took me a little while to pull together the color choices on this one, but I have a lot of blue polishes that I really love, so I decided to go that route.

water marble: cult nails manipulative and revlon fashionista

I started with two coats of NYC French White Tip and used it plus Cult Nails Manipulative, (pale aqua with shimmer) and Revlon Fashionista (deep teal). Revlon Fashionista is my untried for 30 Days of Untrieds. Just having an untried in here violates the water marble rules I set for myself after my last attempt, but that’s just the way it goes when you’re in the midst of a challenge!

water marble: cult nails manipulative and revlon fashionista

For this one, it was actually the untried Revlon Fashionista that performed the best. The drops easily spread out across the top of the water. Both Cult Nails Manipulative and NYC French White Tip refused to spread very much. In general the whole thing dried pretty quickly, so I had a few tries that fell apart before I even got to finish drawing the design. I used a dotting tool to add some Revlon Fashionista.

water marble: cult nails manipulative and revlon fashionista

And cleanup was a real bitch on this one. The blue polishes, primarily Revlon Fashionista, really didn’t want to come off of my skin. Sorry for the mess, I really did try very hard to clean up but to no avail.

30-Day Challenge, 30 Days of Untrieds

Please visit some of the other bloggers that are participating in the 30 Day Challenge this month. I know we will need a lot of encouragement to get through! Click here to see them:


Water Marbling: Lessons Learned

For your viewing pleasure, this is my first attempt at water marbling intended to be worn in public. What I mean by that is the first time I stumbled across the concept of water marbling and watched a video tutorial on how to do it, I had to give it a try immediately. It was just with the first bunch of polishes I could grab, and I had absolutely no intention of leaving it on, i just had to try it on one nail. That was many, many months ago. It actually came out well in terms of execution but the colors weren’t right since I hadn’t actually tried to pick ones that went well together.

So now what you see here was an attempt that actually was intended for public consumption. Let me say upfront that I know the photo isn’t that great, and neither is the condition of the manicure. I don’t have any excuse for the photo other than that the lighting was bad when I took it and it’s just what I had to deal with. But as far as the manicure, I had already been wearing it for a week when I took this, so please forgive the chips, nail growth, etc.

Overall I’d give myself a C+/B- on this in terms of how happy I was with it. I learned a few valuable lessons, which I’ll share in a second.

Before I get to that, here are the colors I used. The base color on all of my nails is two coats of Zoya Jolene (hot pink). For the water marbles on my two ring fingers, I used Zoya Jolene, Zoya Robyn (neon blue), Zoya Jancyn (neon orange), Orly Rage (shimmery bronze) and Revlon Calla Lilly (sparkly white). I used Maybelline Express Finish Base & Top Coat as the basecoat, and one coat of Poshe as the top coat.

Image

First: Don’t be an idiot that uses a polish she’s never tried on before AT ALL in a water marble. I bought the Revlon Calla Lilly specifically because I wanted a white to use in water marbling (and because I had a coupon for it at Target). But what I realized too late is that it’s actually very sheer, so it just wasn’t a good choice to use in this type of nail art. If you look on my right finger you can see a faint hint of glitter just about where the glare spot is. That’s the Calla Lilly. On my left finger, you’ll see a huge wide open space in the middle of the nail that butts up against a nice swirl of Orly Rage: that’s the Revlon Calla Lilly. So using a visible color here would have made a huge difference. Duh. This is the part where I confess that I actually hadn’t tried on any of them before; I had recently purchased all of these colors (the Zoyas in particular with water marbling in mind) and hadn’t used any of them yet. Double duh. That said, the others were great.

Second: I think I used too much of the Jolene, i.e. the base color, in the water marble design. I wanted it to be tied in to the rest of the manicure, but I think I ended up with spots where it just looked blank because it was the same color as the base.

Third: Orly Rage looks absolutely amazing in a water marble. I loved, loved, loved the way it looked. It really drew my eye to it. I would actually catch myself staring at it sometimes. Will definitely use it in another one.

So that’s the long and short of it. Perhaps next time I will graduate to a full set of water marbles, though I have to admit that the thought is rather daunting. It’s a very cool process that is very difficult to control. But if it comes out right, so, so cool!

Tag Cloud