A girl and her love of nail polish

Posts tagged ‘Essie’

12 Days Of Christmas Challenge: Snowmen

Day 4 of the 12 Days Of Christmas Challenge already? How did that happen? Today’s prompt is snowmen.

Christmas/Winter nail art: Snowmen

A few days ago I featured Rescue Beauty Lounge Piu Mosso on the blog. I used that same mani as the base for this one, so there is a little bit of wear. This is two coats of Piu Mosso plus one coat of Poshe fast-dry top coat to start, and then I added one coat of China Glaze Fairy Dust. The Piu Mosso made it look to me like a night scene, so I thought the China Glaze Fairy Dust would almost look like stars or maybe snow.

Christmas/Winter nail art: Snowmen

I then used a large dotting tool to add the snow across the bottom of each nail with OPI My Boyfriend Scales Walls. I used the same color to do the first layer of dots for all of the snowmen. I then added a second dot to each that was just slightly smaller than the original using NYC French White Tip. My working theory was that since the OPI is a white with a gray tinge that it would provide a little shading compared to the stark white NYC color. Not sure that came through in the finished product, but that was the idea.

Christmas/Winter nail art: Snowmen

I used a small dotting tool to create the scarves with Essie Very Cranberry, and then used Orly Liquid Vinyl for the coal buttons and eyes.

I finished it off with one coat of Poshe.

Christmas/Winter nail art: Snowmen12 Days Of Christmas Nail Art Challenge


12 Days Of Christmas Challenge: Holiday Song – Jingle Bells

It’s Day 2 of the 12 Days Of Christmas Nail Art Challenge sponsored by Pink & Polished Nails and Over Polished. The theme for today is Holiday Songs.

Christmas Nail Art: Jingle Bells

My inspiration is Jingle Bells. I started with two coats of Essie Very Cranberry.

Christmas Nail Art: Jingle Bells

For the art, the first thing I did was the bow, drawn on with It’s So Easy Stripe Rite in green. Then I added the bells. I needed larger dots than what my dotting tools could make, so I used the blunt end of a wooden skewer. The polish is Orly Rage. When that was relatively dry, I added the little openings at the bottom of the bells with a Kiss Nail Artist Fine Art Pen in black. I finished with a coat of Poshe fast-dry top coat.

Christmas Nail Art: Jingle Bells

Christmas Nail Art: Jingle Bells

12 Days Of Christmas Nail Art Challenge

Please visit some of the other bloggers participating in the 12 Days Of Christmas Nail Art Challenge:


Nail-aween Nail Art Challenge: Witch Magic Water Marble

I took a few liberties with Day 8 of the Nail-aween Nail Art Challenge from datyorkLOVES/SassyNails. The theme is witches, but instead of doing a green face or a pointed hat (many have already done those way better than I could), I wanted to try to portray a different aspect of witches: magic.

My thinking was something swirly and purple with some stars, so here’s what I came up with: water marble with fimo stars.

Halloween Water Marble Magic Witch Nail Art

I started with three coats of A-England Morgan Le Fay as the base, which is a super shimmery white. I was planning to use it in the water marble, but as soon as I started I remembered that this polish is no good for water marbles. It just doesn’t spread out over the water well. Oh well.

For the water marble, I used three polishes: Essie Sexy Divide (deep shimmery purple), Orly Rage (rose gold metallic) and OPI Lincoln Park After Dark (vampy near-black burgundy creme).

Halloween Water Marble Magic Witch Nail Art

I found this video tutorial on how to do a swirl water marble. As usual with water marbling, it always turns out to be much harder than it looks. I couldn’t quite get the swirl effect I was going for, but I still like the way it came out.

Halloween Water Marble Magic Witch Nail Art

The fimo stars are from a recent EBay spree. I used regular top coat to glue them on and seal them, and then a coat of Poshe fast-dry top coat over the whole nail.

This nail is the one that came the closest to what I wanted in terms of the swirl effect.

Halloween Water Marble Magic Witch Nail Art

Nail-aween Halloween Nail Art Challenge

Check out all of the NailAween Nail Art Artists!

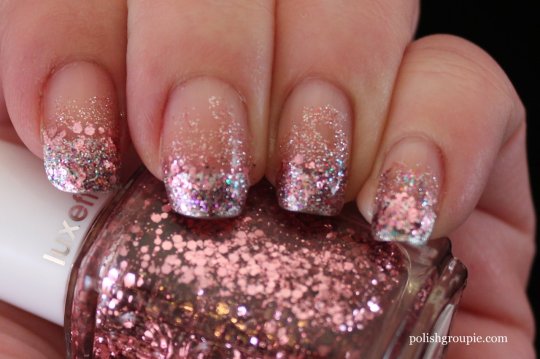
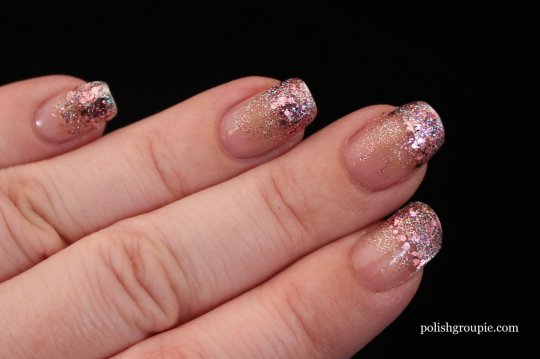
Polish Us Pink – Pink Glitter Gradient

As you’ve hopefully heard by now, October is breast cancer awareness month. Several nail polish bloggers have organized the Polish Us Pink campaign, through which they will be posting pink manicures on Mondays throughout the month to help raise awareness. I’m joining in with today’s pink glitter gradient, which is dedicated to my grandmother. She was a breast cancer survivor.

This manicure is similar to the silver and gold glitter gradient I did last month. There’s a link to a tutorial in that one if you want to learn more about the technique.

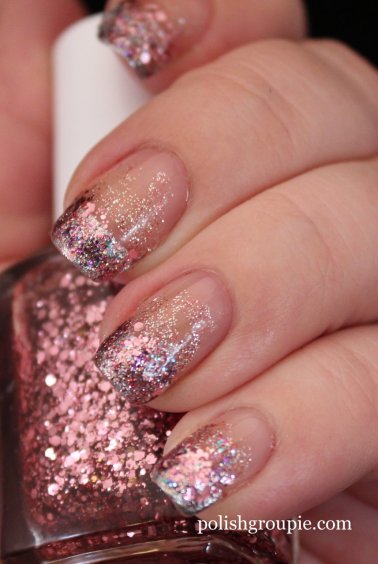
Pink Glitter Gradient Nail Art with Essie Luxeffects A Cut Above

I started with a clear base coat and then added Sonia Kashuk Smoke And Mirrors, a silver metallic, to my tips (in retrospect I wish I had started with a pink polish instead of the silver but at the time I wanted something metallic. I now think something shimmery pink would have been fine).

Pink Glitter Gradient Nail Art with Essie Luxeffects A Cut Above

I then brushed on Essie Luxeffects A Cut Above (medium and small pink hex glitter in a clear base), concentrating on the line where the tips met my nail to start the gradient.

I added on a little bit of OPI Mad As A Hatter, which is a much-coveted densely packed multi-glitter with pink, purple, silver and turquoise, spreading that to about the halfway mark.

Pink Glitter Gradient Nail Art with Essie Luxeffects A Cut Above

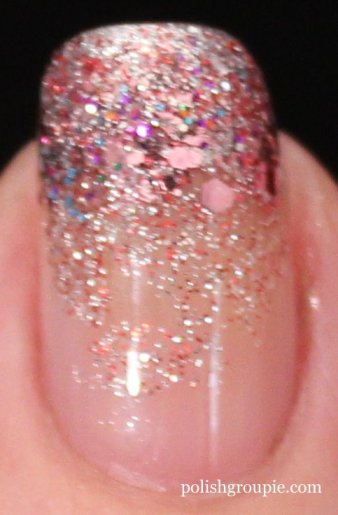
And to top it off I layered on Ulta After Party, which looks pink in the bottle but I think technically is just red and silver micro glitter, bringing that almost the the cuticle line.

Pink Glitter Gradient Nail Art with Essie Luxeffects A Cut Above

Blurry to show glittery goodness

For more about breast cancer, please visit  the breast cancer page on the American Cancer Society’s Web page, which has lots of information about mammograms, treatment and how to get involved with the fight for a cure.

Here’s a look at some of the other bloggers participating in Polish Us Pink. Please click here to see them:


30 Day Challenge Day 29 – Supernatural: Vampire Nail Art

Coming in under the wire here on Day 29 of the 30 Day Challenge because it took me all day to figure out exactly how I wanted to portray the theme of vampires for my inspired by the supernatural manicure.

Vampire Nail Art

I’m a big fan of most things vampire these days: Buffy The Vampire Slayer, True Blood, Twilight, Being Human, Anne Rice novels, etc., etc..

I finally found this manicure based on the Buffy The Vampire Slayer TV series, so I used that as the basis and then tweaked it a bit to be more generally vampire themed rather than specifically Buffy.

The thumb represents fire. The index finger represents dripping blood, ever-present in most vampire lore. The middle finger is a cross necklace. The ring finger is a stake through a heart and the pinkie is a vampire bite. So representing both sides with this one: the vampires and the weapons that can take them down.

Vampire Nail Art

Here are the polishes I used:
thumb: two coats of Color Club Catwalk Queen, Sinful Colors Lets Meet, Kiko 359, China Glaze Riveting, Ulta Steppin Out

Vampire Nail Art Fire

index: two coats of Ulta Snow White, Ulta Steppin Out

middle: three coats Orly Royal Velvet (untried for 30 Days of Untried), Kiss Silver striper polish

Vampire Nail Art Dripping Blood, Cross/Crucifix

ring: two coats of Orly Liquid Vinyl, Essie Very Cranberry, Kiss Silver striper polish

pinkie: two coats of Ulta Snow White, Orly Liquid Vinyl, Ulta Steppin Out

Vampire Nail Art Stake Through The Heart, Vampire Bite

30-Day Challenge, 30 Days of Untrieds

Please visit some of the other bloggers that are participating in the 30 Day Challenge this month. I know we will need a lot of encouragement to get through! Click here to see them:


30 Day Challenge Day 27 – Artwork: Mark Rothko Nail Art

I had to enlist my sister for help with this one because she works in the fine art field. I needed recommendations on artists to look at for Day 27 of the 30 Day Challenge, inspired by artwork. She pointed me toward Mark Rothko, an abstract artist whose nearly 50 year career started in New York in the early 1920s.

Mark Rothko paintingsMark Rothko paintings

Mark Rothko Nail Art

I modeled each nail after a different one of his paintings.

Pinkie: I started with two coats of Sinful Colors Let’s Meet. The orange block is China Glaze Riveting and the white block is NYC French White Tip

Ring: The base is two coats of Sinful Colors Slate. The violet block is A-England Elaine and the white block is NYC French White Tip.

Mark Rothko Nail Art

Middle: The base is one coat of Essie Very Cranberry. The middle block is Sally Hansen Wine Not, the bottom block is Kiko 359 with a little Wine Not mixed in, and the top block is Megan Miller Lemon Ice, my untried for the 30 Days of Untrieds challenge I’m doing simultaneously.

Index: I started with two coats of Sinful Colors Cinderella. The top and bottom blocks are an unnamed shimmery turquoise shade from Paris Nail Lacquers (also untried). The middle stripe is the same color mixed with a little Wet n Wild I Need A Refresh-Mint

Mark Rothko Nail Art

Thumb: One thick coat of Orly Liquid Vinyl. The stripe is Sinful Colors Ruby Ruby mixed with China Glaze Riveting.

Mark Rothko Nail Art

Hope you like it!


30-Day Challenge, 30 Days of Untrieds

Please visit some of the other bloggers that are participating in the 30 Day Challenge this month.
I know we will need a lot of encouragement to get through! Click here to see them:


30 Day Challenge Day 23 – Movie: Wizard Of Oz

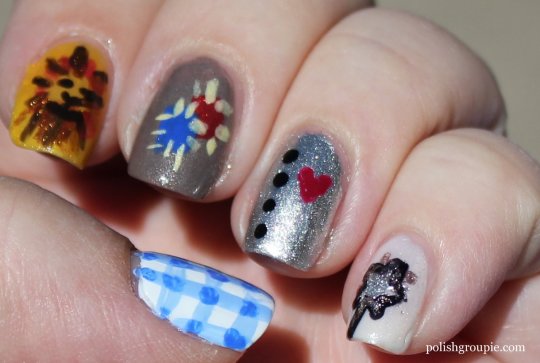
I had the idea for this manicure pretty early on but it took me a little while to figure out exactly how to portray it. Day 23’s manicure theme is inspired by a movie, and the movie I chose is The Wizard Of Oz.

Wizard Of Oz Nail Art

Wizard Of Oz Nail Art

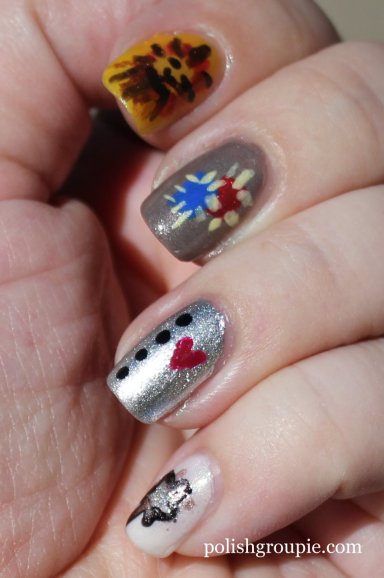
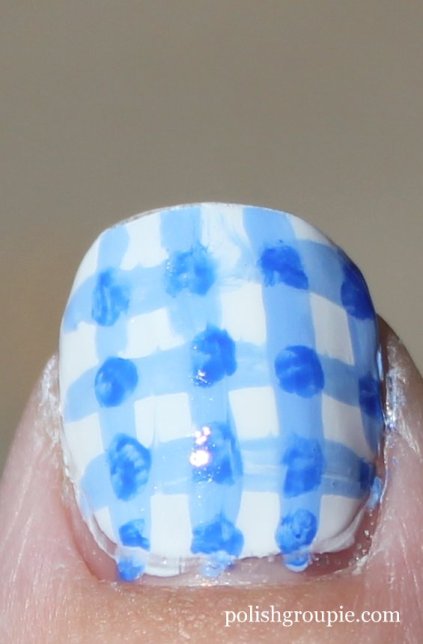
My thumb is for Dorothy, a blue and white gingham pattern like her dress. I used Ulta Snow White as the base, my untried for the 30 Days of Untrieds challenge I’m doing simultaneously. For the stripes, I used Nails Inc. Baker Street. I mixed it with white for the lighter shade of blue.

Dorothy Gingham Wizard Of Oz Nail Art

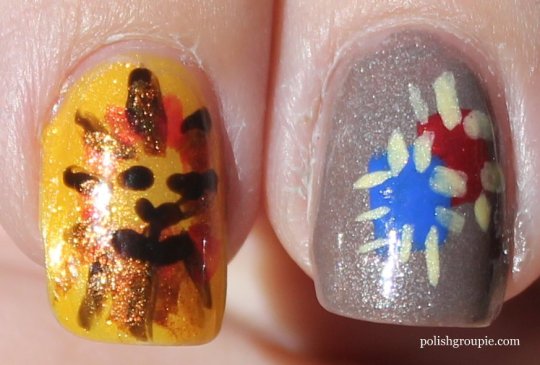
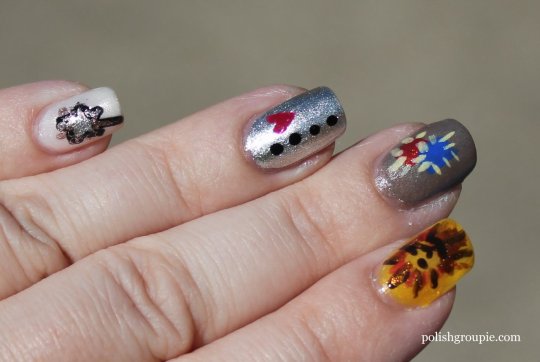
My index finger is for the Cowardly Lion. The base is Sinful Colors Let’s Meet. The middle finger is patches for the Scarecrow, on a base of Essie Mocacino.

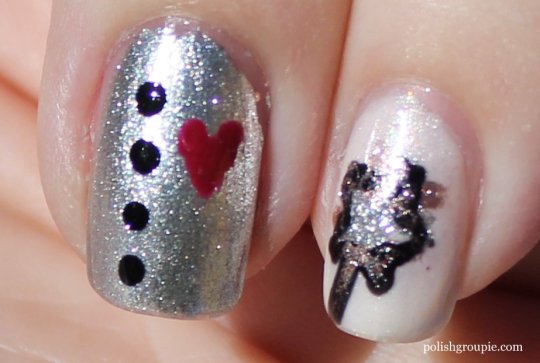
Cowardly Lion, Scarecrow Wizard Of Oz Nail Art The ring finger is for the Tin Man getting his heart, on a base of Sonia Kashuk Smoke And Mirrors, and the pinkie is Glenda the Good Witch’s wand, on a base of Sinful Colors Social Ladder.

Tin Man, Good Witch Wizard Of Oz Nail Art

I used a bunch of other colors and lost track a little bit. I know there’s some Zoya Codie in the lion’s mane and the face, the patches are Nails Inc. Baker Street and Essie Very Cranberry, which I also used as the heart. The wand is silver and black striper polish from Kiss.

Wizard Of Oz Nail Art

I topped it off with Poshe fast-dry top coat.

30-Day Challenge, 30 Days of Untrieds

Please visit some of the other bloggers that are participating in the 30 Day Challenge this month.
I know we will need a lot of encouragement to get through! Click here to see them:


Tag Cloud