A girl and her love of nail polish

Posts tagged ‘Orly’

12 Days Of Christmas Challenge: Snowmen

Day 4 of the 12 Days Of Christmas Challenge already? How did that happen? Today’s prompt is snowmen.

Christmas/Winter nail art: Snowmen

A few days ago I featured Rescue Beauty Lounge Piu Mosso on the blog. I used that same mani as the base for this one, so there is a little bit of wear. This is two coats of Piu Mosso plus one coat of Poshe fast-dry top coat to start, and then I added one coat of China Glaze Fairy Dust. The Piu Mosso made it look to me like a night scene, so I thought the China Glaze Fairy Dust would almost look like stars or maybe snow.

Christmas/Winter nail art: Snowmen

I then used a large dotting tool to add the snow across the bottom of each nail with OPI My Boyfriend Scales Walls. I used the same color to do the first layer of dots for all of the snowmen. I then added a second dot to each that was just slightly smaller than the original using NYC French White Tip. My working theory was that since the OPI is a white with a gray tinge that it would provide a little shading compared to the stark white NYC color. Not sure that came through in the finished product, but that was the idea.

Christmas/Winter nail art: Snowmen

I used a small dotting tool to create the scarves with Essie Very Cranberry, and then used Orly Liquid Vinyl for the coal buttons and eyes.

I finished it off with one coat of Poshe.

Christmas/Winter nail art: Snowmen12 Days Of Christmas Nail Art Challenge


12 Days Of Christmas Challenge: Holiday Song – Jingle Bells

It’s Day 2 of the 12 Days Of Christmas Nail Art Challenge sponsored by Pink & Polished Nails and Over Polished. The theme for today is Holiday Songs.

Christmas Nail Art: Jingle Bells

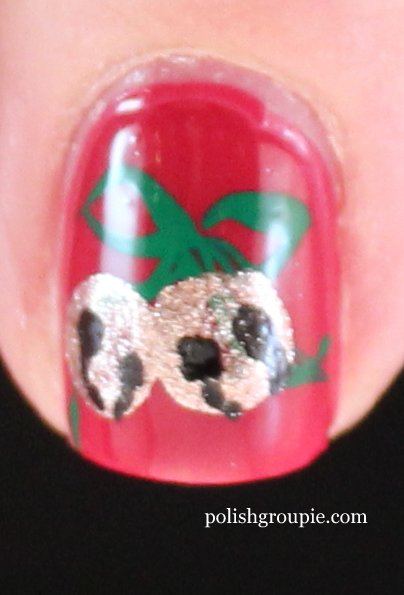
My inspiration is Jingle Bells. I started with two coats of Essie Very Cranberry.

Christmas Nail Art: Jingle Bells

For the art, the first thing I did was the bow, drawn on with It’s So Easy Stripe Rite in green. Then I added the bells. I needed larger dots than what my dotting tools could make, so I used the blunt end of a wooden skewer. The polish is Orly Rage. When that was relatively dry, I added the little openings at the bottom of the bells with a Kiss Nail Artist Fine Art Pen in black. I finished with a coat of Poshe fast-dry top coat.

Christmas Nail Art: Jingle Bells

Christmas Nail Art: Jingle Bells

12 Days Of Christmas Nail Art Challenge

Please visit some of the other bloggers participating in the 12 Days Of Christmas Nail Art Challenge:


Nail-aween Nail Art Challenge: Witch Magic Water Marble

I took a few liberties with Day 8 of the Nail-aween Nail Art Challenge from datyorkLOVES/SassyNails. The theme is witches, but instead of doing a green face or a pointed hat (many have already done those way better than I could), I wanted to try to portray a different aspect of witches: magic.

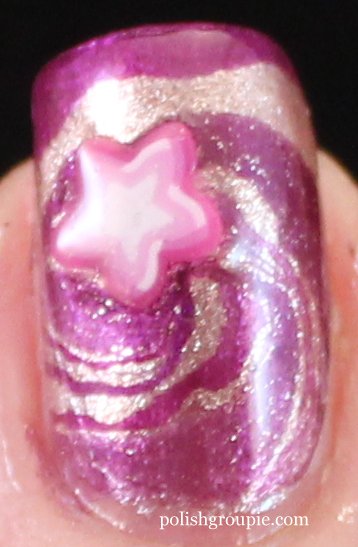
My thinking was something swirly and purple with some stars, so here’s what I came up with: water marble with fimo stars.

Halloween Water Marble Magic Witch Nail Art

I started with three coats of A-England Morgan Le Fay as the base, which is a super shimmery white. I was planning to use it in the water marble, but as soon as I started I remembered that this polish is no good for water marbles. It just doesn’t spread out over the water well. Oh well.

For the water marble, I used three polishes: Essie Sexy Divide (deep shimmery purple), Orly Rage (rose gold metallic) and OPI Lincoln Park After Dark (vampy near-black burgundy creme).

Halloween Water Marble Magic Witch Nail Art

I found this video tutorial on how to do a swirl water marble. As usual with water marbling, it always turns out to be much harder than it looks. I couldn’t quite get the swirl effect I was going for, but I still like the way it came out.

Halloween Water Marble Magic Witch Nail Art

The fimo stars are from a recent EBay spree. I used regular top coat to glue them on and seal them, and then a coat of Poshe fast-dry top coat over the whole nail.

This nail is the one that came the closest to what I wanted in terms of the swirl effect.

Halloween Water Marble Magic Witch Nail Art

Nail-aween Halloween Nail Art Challenge

Check out all of the NailAween Nail Art Artists!

Nail-aween Nail Art Challenge: Ghosts and Goblins

It’s Day 5 of the Nail-aween Nail Art Challenge from datyorkLOVES/SassyNails. for me, and the theme is ghosts and goblins. There are 10 themes, and I have to complete all of them by the end of October, but other than that, it’s self-paced.Ghosts Goblin Jack-o-lantern pumpkin Halloween nail art

As far as Halloween nail art goes, this one is pretty basic, really just a few doodles with some nail art pens.

For my ghost, I used two coats of Ulta Snow White. The green goblin starts off with two coats of Sinful Colors Exotic Green, while the two jack-o’-lantern pumpkin nails are two coats of a no-name orange creme from a polish line called Paris. The black “Boo” nail is based on two coats of Orly Liquid Vinyl.

Ghosts Goblin Jack-o-lantern pumpkin Halloween nail art

All of the black and white details were done with Nail Artist pens from Kiss, which came together as a pair. I bought them at Target. These types of pens are great, really no different than using a regular pen. The black was perfect for what I needed here; the white didn’t cover quite as well as I had hoped.

Ghosts Goblin Jack-o-lantern pumpkin Halloween nail art

If you do something like this, definitely do a practice run where you’re drawing upside down before you start drawing on your nail. There really wasn’t a good way to hold my hand where I could hold it with the tips pointed toward me and still draw on them.

Nail-aween Halloween Nail Art Challenge

Check out all of the NailAween Nail Art Artists!

Nail-aween Nail Art Challenge: Matte Dotticure

So this is my Day 2 post for the Nail-aween Nail Art Challenge from datyorkLOVES/Sassy Nails. There are 10 themes, and I have to complete all of them by the end of October, but other than that, it’s self-paced.

Today’s theme is a matte dotticure. I was really happy with the way this one came out, and it was really fun to wear.

Halloween Dotticure Dotting Nail Art with China Glaze Riveting

Halloween Dotticure Dotting Nail Art with China Glaze Riveting

I started with two coats of Orly Liquid Vinyl on all of my nails except my ring finger, which is two coats of China Glaze Riveting.

I added one coat of Poshe quick-dry top coat. As I did, some of the China Glaze Riveting transferred to the brush and then to my nail as I was painting the next black nail, and it left behind a bit of the orange shimmer. I really loved the way it looked, so I decided to do some minor frankening: I mixed a bit of the two colors together on some wax paper and then painted that on top of the black nails so they’d all have a bit of the orange shimmer on them. Topped all of that off with Poshe when I was finished.

Halloween Dotticure Dotting Nail Art with China Glaze Riveting

Then I added dots. I started with Ulta Snow White dots using the head of a pin, then used a small dotting tool for the inner dots: black on the orange nail, orange on the black nails. The accent nail almost looks like a bunch of googly eyes, don’t you think?

Halloween Dotticure Dotting Nail Art with China Glaze Riveting

To make it matte, I added one coat of Essie Matte About You. Unfortunately I didn’t let it dry long enough before I applied it, and it smeared some of the dots. 😦 The matte effect wasn’t very strong, perhaps I needed to add more.

Halloween Dotticure Dotting Nail Art with China Glaze Riveting

Here’s a look at the manicure before I added the matte top coat.

Halloween Dotticure Dotting Nail Art with China Glaze Riveting

Halloween Dotticure Dotting Nail Art with China Glaze Riveting

Halloween Dotticure Dotting Nail Art with China Glaze Riveting

Nail-aween Halloween Nail Art Challenge

Check out all of the NailAween Nail Art Artists!

Nail-aween Nail Art Challenge: Water Marble

So this is my Day 1 post for the Nail-aween Nail Art Challenge from datyorkLOVES/SassyNails. There are 10 themes and I have to complete all of them by the end of October, but other than that, it’s self-paced.

So today’s theme is water marble. I’m not that happy with the way it came out. I tried to fix it, and I think that made it worse. Alas.

Halloween Water Marble Nail Art

I started with two coats of Ulta Snow White and then moved on to the water marble. I went with Halloween colors: black – Orly Liquid Vinyl; orange – Zoya Jancyn; purple – Sally Hansen Rock Hard; and white – Ulta Snow White.

Halloween Water Marble Nail Art

When I was done, I thought some of them looked a little messy so I tried to camouflage with some dots, using Sally Hansen Rock Hard. The polish was a bit on the sheer side, so then I started with a dot of Ulta Snow White and laid a dot of Rock Hard on top of it. Mistake. They didn’t look that great, and the smeared a bit on my index finger when I added a coat of Poshe fast dry top coat, making it look messier than it really was. I should have just left well enough alone and not tried to add the dots.

Halloween Water Marble Nail Art

Cleanup was a little tough with this; I suppose that’s par for the course.

Halloween Water Marble Nail Art

I did like the way the middle finger came out,and the ring finger almost looked like a spider web.

Nail-aween Halloween Nail Art Challenge

Check out all of the NailAween Nail Art Artists!

Sinful Colors Zincing Of You Leopard Print Nail Art

Wow, I definitely needed a day off after the manic posting schedule that was the 30 Day Challenge. But I’m back in the saddle today with my first leopard print manicure.

Sinful Colors Zincing Of You Leopard Print Nail Art

I started with two coats of Sinful Colors Zincing Of You from the new Hot Flash Metallics fall collection. It’s a sparkly taupe with a foil finish. Really pretty!

I’ve seen a lot of tutorials for leopard print manicures, but I used this video tutorial from CutePolish.

Sinful Colors Zincing Of You Leopard Print Nail Art

For the spots, I used Cos Bar Bronze from the Shops At Target collection. It was a little sheer, though, so I had to double up the dots. The black is Orly Liquid Vinyl, applied with a small dotting tool. It’s topped off with one coat of Poshe fast-dry top coat.

Sinful Colors Zincing Of You Leopard Print Nail Art

This is pretty quick and easy as far as nail art goes, just dab and dot!

(For more animal prints, see my zebra stripe french tips manicure.)

Sinful Colors Zincing Of You Leopard Print Nail Art

Here’s a look at Sinful Colors Zincing Of You on its own.

Sinful Colors Zincing Of YouSinful Colors Zincing Of You

Are you falling in love with the fall metallics trend?

Tag Cloud