A girl and her love of nail polish

Archive for May, 2012

Enchanted Polish Tragedy!

It was a happy day at the Polish Groupie house, for about 15 minutes. Then, it became a dark day indeed. Waiting for me in the mailbox was a happy little parcel from Enchanted Polish, containing the three completely awesome holo polishes I snagged during Chelsea’s last restock on Etsy. I got Lucy In the Sky With Diamonds, Magic Mirror and Cranberry Cosmo (the one that was an early front runner for new favorite bestest-ever color).

Then came the error in judgement that will haunt me until I somehow manage to procure another bottle: I let The Toddler play with the bottles, and before I even knew what happened he had somehow managed to break the bottle of Cranberry Cosmo.

Luckily he was not injured, so that’s the main thing. But the polish spilled all over my hardwood floor (and onto his little fingers and toes, so he managed to track a bit of it from living room into the kitchen and even smear it on some cabinets before I could get everything cleaned up). Thank goodness my mother is visiting or I would never have been able to manage. As it was, I soaked up as much as I could with paper towels while she cleaned him up, and then I had to make a trip to buy some non-acetone polish remover to use on the floors (acetone would have eaten away the finish).

So I lost the bottle and had a craptastic time cleaning up as well. Dark day indeed.

Here’s a look at my sad little Cranberry Cosmo in the trash. 😦

Spilled Cranberry Cosmo

NOTD: Sneeze Breeze Tips

I was dying to try out The Hungry Asian’s Sneeze Breeze and knew I wanted something simple that would really show it off and let it shine in all its glittery glory. I was inspired by this Black Ice New Year’s Eve nail art from Polish and Pearls, but in the end I chickened out and ended up with something much more basic. This is two coats of Orly Black Vinyl with two coats of Sneeze Breeze on the tips, plus one coat of Poshe.

Image

First Look: Cos Bar At Target

If you haven’t checked out the new ‘Shops at Target’ thing that Target has going on right now, it might be worth your while just to pick up some of the nail polishes there from Cos Bar, a high-end cosmetics store in Aspen. I grabbed all four of the colors they were offering, which were $3 each for a 0.33 FL OZ/9.8 mL bottle. The bottles themselves don’t have names on them, but they do have names in their listings on target.com: Lime Green, Purple, Copper.and Bronze (l to r). I also picked up a bar of cucumber melon soap from the Cos Bar collection, which is included in the photo just because of its snazzy wrapper. Will use them in some nail art soon; They all look very shimmery, and I’m thinking they might make for a wicked water marble.

Image

Water Marbling: Lessons Learned

For your viewing pleasure, this is my first attempt at water marbling intended to be worn in public. What I mean by that is the first time I stumbled across the concept of water marbling and watched a video tutorial on how to do it, I had to give it a try immediately. It was just with the first bunch of polishes I could grab, and I had absolutely no intention of leaving it on, i just had to try it on one nail. That was many, many months ago. It actually came out well in terms of execution but the colors weren’t right since I hadn’t actually tried to pick ones that went well together.

So now what you see here was an attempt that actually was intended for public consumption. Let me say upfront that I know the photo isn’t that great, and neither is the condition of the manicure. I don’t have any excuse for the photo other than that the lighting was bad when I took it and it’s just what I had to deal with. But as far as the manicure, I had already been wearing it for a week when I took this, so please forgive the chips, nail growth, etc.

Overall I’d give myself a C+/B- on this in terms of how happy I was with it. I learned a few valuable lessons, which I’ll share in a second.

Before I get to that, here are the colors I used. The base color on all of my nails is two coats of Zoya Jolene (hot pink). For the water marbles on my two ring fingers, I used Zoya Jolene, Zoya Robyn (neon blue), Zoya Jancyn (neon orange), Orly Rage (shimmery bronze) and Revlon Calla Lilly (sparkly white). I used Maybelline Express Finish Base & Top Coat as the basecoat, and one coat of Poshe as the top coat.

Image

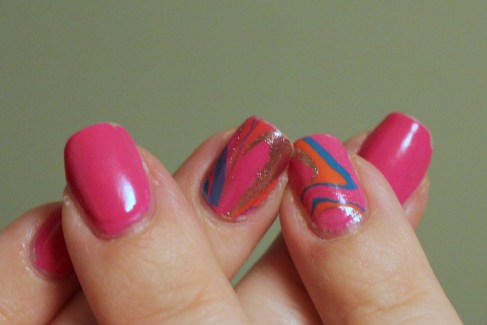
First: Don’t be an idiot that uses a polish she’s never tried on before AT ALL in a water marble. I bought the Revlon Calla Lilly specifically because I wanted a white to use in water marbling (and because I had a coupon for it at Target). But what I realized too late is that it’s actually very sheer, so it just wasn’t a good choice to use in this type of nail art. If you look on my right finger you can see a faint hint of glitter just about where the glare spot is. That’s the Calla Lilly. On my left finger, you’ll see a huge wide open space in the middle of the nail that butts up against a nice swirl of Orly Rage: that’s the Revlon Calla Lilly. So using a visible color here would have made a huge difference. Duh. This is the part where I confess that I actually hadn’t tried on any of them before; I had recently purchased all of these colors (the Zoyas in particular with water marbling in mind) and hadn’t used any of them yet. Double duh. That said, the others were great.

Second: I think I used too much of the Jolene, i.e. the base color, in the water marble design. I wanted it to be tied in to the rest of the manicure, but I think I ended up with spots where it just looked blank because it was the same color as the base.

Third: Orly Rage looks absolutely amazing in a water marble. I loved, loved, loved the way it looked. It really drew my eye to it. I would actually catch myself staring at it sometimes. Will definitely use it in another one.

So that’s the long and short of it. Perhaps next time I will graduate to a full set of water marbles, though I have to admit that the thought is rather daunting. It’s a very cool process that is very difficult to control. But if it comes out right, so, so cool!

Welcome To My New Adventure!

Hi, and thank you for checking out Polish Groupie, my new blog. I love doing my nails and buying cool nail polish, and back in the day (i.e. grade school and high school) I used to do my fair share of nail art. But, you know, life happens and sometimes fun stuff you used to do as a kid falls by the wayside.

But my interest was recently rekindled when I learned that China Glaze was putting out a Hunger Games-themed line of nail polishes. As I started looking around on the Web for information about the line, I stumbled upon the wonderful world of nail polish blogs. There are a lot of very creative ladies out there putting in a lot of time and effort to bring product previews, honest reviews and unique nail art to the world (some of my favorites are listed on my blogroll to the right, with many more to be added soon).

From there I was introduced to the even more wonderful world of indie nail polishes, many of which are sold in limited release on Etsy.  I didn’t even know people could make their own polishes, let alone sell them. Crazy! Maybe someday I’ll get there on my own, but for now I can just live vicariously through these mavens by buying their wares (when I can get my hands on them).

I must confess that my collection is tiny at this point, but hey, you have to start somewhere. In fact I just received my first indie polish about a week ago, with a few more on the way. Here it is, Sneeze Breeze, a black/blue glitter polish with a clear base. It’s from The Hungry Asian on Etsy. Can’t wait to show it to you as part of a manicure.

The Hungry Asian: Sneeze Breeze

Tag Cloud