A girl and her love of nail polish

Posts tagged ‘Sally Hansen’

Nail-aween Nail Art Challenge: Water Marble

So this is my Day 1 post for the Nail-aween Nail Art Challenge from datyorkLOVES/SassyNails. There are 10 themes and I have to complete all of them by the end of October, but other than that, it’s self-paced.

So today’s theme is water marble. I’m not that happy with the way it came out. I tried to fix it, and I think that made it worse. Alas.

Halloween Water Marble Nail Art

I started with two coats of Ulta Snow White and then moved on to the water marble. I went with Halloween colors: black – Orly Liquid Vinyl; orange – Zoya Jancyn; purple – Sally Hansen Rock Hard; and white – Ulta Snow White.

Halloween Water Marble Nail Art

When I was done, I thought some of them looked a little messy so I tried to camouflage with some dots, using Sally Hansen Rock Hard. The polish was a bit on the sheer side, so then I started with a dot of Ulta Snow White and laid a dot of Rock Hard on top of it. Mistake. They didn’t look that great, and the smeared a bit on my index finger when I added a coat of Poshe fast dry top coat, making it look messier than it really was. I should have just left well enough alone and not tried to add the dots.

Halloween Water Marble Nail Art

Cleanup was a little tough with this; I suppose that’s par for the course.

Halloween Water Marble Nail Art

I did like the way the middle finger came out,and the ring finger almost looked like a spider web.

Nail-aween Halloween Nail Art Challenge

Check out all of the NailAween Nail Art Artists!

30 Day Challenge Day 27 – Artwork: Mark Rothko Nail Art

I had to enlist my sister for help with this one because she works in the fine art field. I needed recommendations on artists to look at for Day 27 of the 30 Day Challenge, inspired by artwork. She pointed me toward Mark Rothko, an abstract artist whose nearly 50 year career started in New York in the early 1920s.

Mark Rothko paintingsMark Rothko paintings

Mark Rothko Nail Art

I modeled each nail after a different one of his paintings.

Pinkie: I started with two coats of Sinful Colors Let’s Meet. The orange block is China Glaze Riveting and the white block is NYC French White Tip

Ring: The base is two coats of Sinful Colors Slate. The violet block is A-England Elaine and the white block is NYC French White Tip.

Mark Rothko Nail Art

Middle: The base is one coat of Essie Very Cranberry. The middle block is Sally Hansen Wine Not, the bottom block is Kiko 359 with a little Wine Not mixed in, and the top block is Megan Miller Lemon Ice, my untried for the 30 Days of Untrieds challenge I’m doing simultaneously.

Index: I started with two coats of Sinful Colors Cinderella. The top and bottom blocks are an unnamed shimmery turquoise shade from Paris Nail Lacquers (also untried). The middle stripe is the same color mixed with a little Wet n Wild I Need A Refresh-Mint

Mark Rothko Nail Art

Thumb: One thick coat of Orly Liquid Vinyl. The stripe is Sinful Colors Ruby Ruby mixed with China Glaze Riveting.

Mark Rothko Nail Art

Hope you like it!


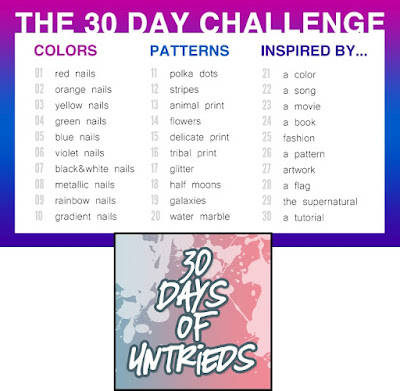
30-Day Challenge, 30 Days of Untrieds

Please visit some of the other bloggers that are participating in the 30 Day Challenge this month.
I know we will need a lot of encouragement to get through! Click here to see them:


30 Day Challenge Day 26 – Pattern: Dark Chevrons

Wow, only a few more days left in the challenge; the end is in sight! For Day 26 of the 30 Day Challenge, we’re tasked with creating something inspired by a pattern.

The pattern I chose was chevrons.

Dark Chevron Nail Art

I started with a base of two coats of Sinful Colors Slate. I then used three different colors to create the chevrons:

Dark Chevron Nail Art

I created the chevron pattern with a series of Xs: start with an X made out of color No. 1 at the cuticle end, then lay an X made out of color No. 2 to the right of it so that you’re moving toward the tip. Then color No. 3 to the right of that. It’s not that far off from the technique you would use for a fishtail braid manicure.

Dark Chevron Nail Art

I alternated the other colors throughout so that they stayed in the same order but I started at a different place in the rotation. So pinkie is 1, 2, 3, then 3 becomes 1 on the next nail, if that makes sense. Each nail was then finished with a final X of Sinful Color Slate so that each would have Slate on the tip.

Dark Chevron Nail Art

I like the pattern on this but I think I would have done better with a different color selection. I was aiming for dark fall colors, but it needed a bit more contrast between the colors. Hey, you live, you learn.

30-Day Challenge, 30 Days of Untrieds

Please visit some of the other bloggers that are participating in the 30 Day Challenge this month.
I know we will need a lot of encouragement to get through! Click here to see them:


30 Day Challenge Day 22 – Song: U2 Silver And Gold Gradient

U2 is my favorite band, so there was little doubt as to whose repertoire I would look to for Day 22 of the 30 Day challenge, where the manicures are supposed to be inspired by a song. The problem was finding a U2 song that inspired something I could actually pull off with my limited nail art skills.

So that brings us to “Silver and Gold,” a song from U2’s Rattle and Hum album. This is a very literal interpretation of the title, obviously not representative of the dark themes of the song, which deal with Apartheid in South Africa and the power of money and wealth. Not sure how I would have put all of that onto my nails.

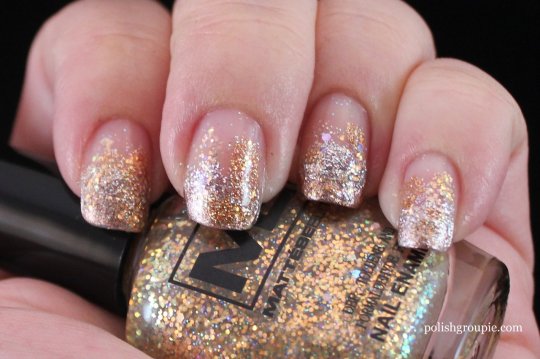
U2 Silver and Gold Glitter Gradient nail art

I found a video tutorial online for a silver and gold glitter gradient and used that as the basis for this manicure.

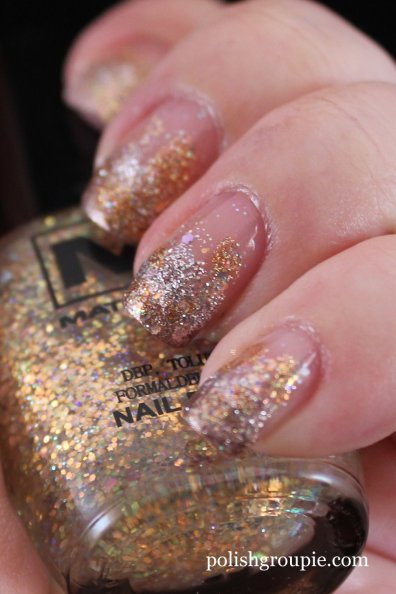
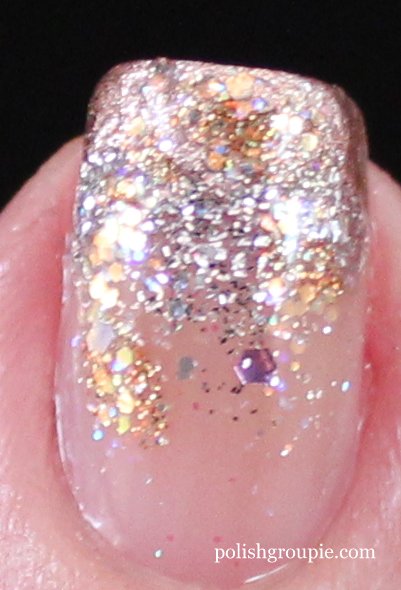
I started with one coat of Seche Natural nail treatment just to have a hint of something on my nails. Then I used two coats of Orly Rage, a rose gold metallic, to paint rough french tips on my nails. Then I dabbed A-England Merlin (dense silver glitter) along the line where the tips met my nail to start the gradient. Next I added Sally Hansen Ice Queen, silver and blue glitter in a clear base, to continue the gradient. I tried to avoid the blue glitter, just dabbing on the silver.

U2 Silver and Gold Glitter Gradient nail art

After that I switched to gold, starting with Petites Color Fever 24K Gold (gold and orange microglitter), then added some Mattese Elite Je Taime (medium gold glitter). This one was my untried, for the 30 Days of Untrieds challenge I’m doing simultaneously. I finished with one coat of Jordana Lilac Hearts (fine glitter with purple hearts in a clear base), just making sure to avoid picking up any of the heart glitter. One coat of Poshe fast-dry top coat to seal it.

U2 Silver and Gold Glitter Gradient nail art

Basically it’s just a lot of layering until I was happy with it. Pretty easy, even for someone with my skill level. Hope you like it, and hope Bono isn’t too offended that I didn’t try to represent the meaning of the song. 🙂

30-Day Challenge, 30 Days of Untrieds

Please visit some of the other bloggers that are participating in the 30 Day Challenge this month.
I know we will need a lot of encouragement to get through! Click here to see them:


30 Day Challenge Day 19: Galaxy Nails

30 Day Challenge Day 19: Galaxy Nails

I’ve been looking forward to Day 19 of the 30 Day Challenge because I’ve been wanting to try galaxy nails and needed the kick in the pants to do it.

Galaxy Nails nail art manicure

By most accounts, creating galaxy nails is a simple nail art project. Well, it is and it isn’t. The technique is simple: dab and dot. Ok, got it. The challenge comes in that it requires a fair amount of restraint. Less is definitely more when it comes to galaxy nails. I read several blog posts and watched many video tutorials, all of which said basically the same thing: be sparse, don’t overdo it with the sponging, leave some space.

Galaxy Nails nail art manicure

But even fully armed with that knowledge, I found it difficult to know when to stop. I think a few of these came out rather nicely; a few are kind of meh. Overall, it was fun and I will definitely do it again.

Galaxy Nails nail art manicure

I used a lot of different colors here, but not all of them were used on every nail. I started with two coats of Orly Liquid Leather, a high-gloss black creme, for the base, followed by one coat of Poshe fast-dry top coat. When it was dry, I sponged on various combinations of these with the corner of a makeup sponge:

  • OPI DS Mystery (untried):  purple-black jelly with gold shimmer
  • Orly Meet Me Under The Mistletoe (Untried): green/gold duochrome
  • Orly Stone Cold (Untried): bright medium blue shimmer
  • Zoya Wednesday: dusty turquoise creme
  • Cult Nails Enigmatic (Untried): eggplant with strong shimmer
  • A-England Morgan Le Fay: sheer white iridescent shimmer
  • Sally Hansen Complete Salon Manicure Wine Not (Untried): berry red with shimmer
  • Kiko 359 (Untried): peach creme

I finished each nail with one coat of Jordana Lilac Hearts. It’s a glitter polish with large purple hearts, but I just left those at the bottom of the bottle and only used the glittery base to get the effect of lots of small stars. Then I put on on a few (too many in some cases) dots with NYC French White Tip using a small dotting tool.

Galaxy Nails nail art manicure

Finished up with one coat of Poshe and called it a night.

30-Day Challenge, 30 Days of Untrieds

Please visit some of the other bloggers that are participating in the 30 Day Challenge this month.
I know we will need a lot of encouragement to get through! Click here to see them:


30 Day Challenge Day 15 – Delicate Print: Sally Hansen Salon Effects Polish Strips

I’m proud to say I’ve made it to the halfway mark in the 30 Day Challenge, but this particular manicure is a bit of a fail. For the delicate print theme, I wanted to try some Sally Hansen Salon Effects Real Nail Polish Strips, my first time using them (satisfies the 30 Days of Untrieds challenge I’m participating in simultaneously).

Sally Hansen Salon Effects Real Nail Polish Strips Vine And Dine

The pattern is called Vine And Dine, and it features a pale blue flower with green leaves and vines on a shimmery white background.

The application on these wasn’t too bad. I used a single strip to cover both my index and ring fingers. They’re a little bit stretchy to enable you to get smooth coverage, which I achieved on my index finger but not on my ring finger (the first one I put on). What I didn’t like was that once on, the strip was a little bit see-through. It would have benefited from a coat of white polish underneath, but the instructions said to put it on a clean dry nail.

Sally Hansen Salon Effects Real Nail Polish Strips Vine And Dine

After that I used two coats of Zoya Robyn (bright blue creme) on my thumb and pinkie, and then three coats of Color Club Fly With Me (shimmery yellow-green) on my middle finger.

I tried to do some dot tips with larger dots of A-England Morgan Le Fay (white shimmer), topped off with smaller dots of the alternating color, but the effect did not come out as I had hoped. The A-England Morgan Le Fay dots came out looking more like a failed french tip.

Oh well. I did like using the nail strips so will try them again some time. Not sure how long the open package will last without drying out but I did tape it back up and put it into a Ziploc bag.

Sally Hansen Salon Effects Real Nail Polish Strips Vine And Dine with Zoya Robyn and Color Club Fly With Me

Anyone tried Sally Hansen nail strips over polish or do they really need to go directly onto the nail?

30-Day Challenge, 30 Days of Untrieds

Please visit some of the other bloggers that are participating in the 30 Day Challenge this month.
I know we will need a lot of encouragement to get through! Click here to see them:


Sally Hansen Magnetic Nail Color Silver Elements

Today I’m showing you Sally Hansen Magnetic Nail Color in Silver Elements, my first foray into the world of magnetic nail polish.

I actually don’t own this one but was able to borrow it (sorry, no bottle shot!). We were at a family gathering in Rhode Island when all of the pre-teen/barely-teen cousins started an impromptu polish party on the front porch. I of course had to check it out to see what they were doing, and what they were doing was putting on this polish, which one of their moms had purchased for them.

This was the tail end of our gathering, and all of the menfolk were champing at the bit to go home, so this was a very quick application for me. Really I just wanted to see how it worked, and I have to say that I was more than pleasantly surprised.

The polish went on very easily and looked great on its own (like a silver foil). But then the magnet creates darker black holographic-ish waves, eye-catching but not too flashy.

Sally Hansen Magnetic Nail Color Silver Elements Magnetic Nail Polish

The magnet, which comes as a separate cap over the top of the bottle, has a small guide to help you line it up at the cuticle end and not hit the top of your nail. I found it very easy to use. My trick was to turn my finger so that I was basically pointing at myself; that let me see where to place the guide and how far it was from the top of my nail so that I could make sure it was level.

I followed the instructions on the bottle: put one coat on all of your nails, apply a thick second coat to one nail and then hold the magnet over it for 10 seconds. Move onto the next nail and repeat.

Sally Hansen Magnetic Nail Color Silver Elements magnetic nail polish

I happened to have a small stash of polish, including my Poshe topcoat, so this is two coats of Silver Elements plus one coat of Poshe. I got a little over-confident in Poshe’s drying ability — maybe not taking into account that it was a thick second coat — so I ended up dinging my index finger in the bathroom, which is why it’s not included in these photos. *sigh*

But all in all I really liked this polish. It’s an easy way of applying “nail art” without requiring too much time, energy or skill.

Sally Hansen Magnetic Nail Color Silver Elements magnetic nail polish

I recently used my Ulta Rewards to procure a bottle of Layla Magneffect, so we’ll see how that one goes. Right off the bat, the magnet on it looks like it will be harder to use than the Sally Hansen one, but who knows. Will show you what I end up with!

What magnetic polishes have you tried? Any favorites?

Tag Cloud